Last updated on January 9th, 2023 at 11:57 am
Welcome to “Beauty At Any Age Volume 2”. For our second installment in this new series, we’ll be talking about how to do an easy smokey eye.
Did you know that the first person to be considered to have worn the smokey eye was Cleopatra? She is especially credited with the heavy Kohl eyeliner (think Elizabeth Taylor in the movie).
The modern day smokey eye is credited to makeup artist Linda Cantello, who created the look for Gucci in the 1990’s when Tom Ford was in charge. The story goes that he requested a more a smudgy, lived-in look which was different than the more precise eye makeup that was in style. It’s been popular ever since.
No matter how much or little you know about the smokey eye, you probably know that it requires multiple shadows and lots of blending to get the look just right. That can be quite intimidating. So to help you create your own smokey eye look, we’ve divided this post into three parts for you.
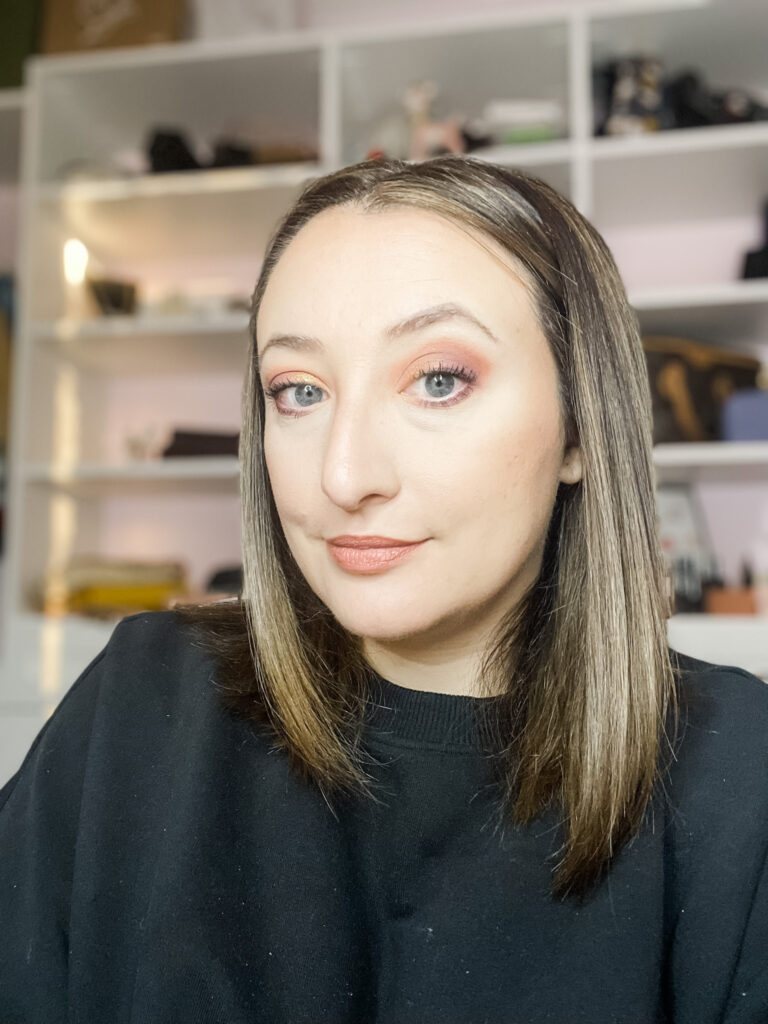
First, Jen has written a very specific, step-by-step on how to create the look. You’ll see her photos on how gorgeous it turned out.
Second, Dianne is going to follow Jen’s instructions, paying careful attention to each step while creating her own look with a different eye shadow palette, eye liner and mascara. Dianne will tell you how following the instructions worked for her and if she had any stumbles along the way. This should eliminate any fear about how to create the smokey eye! We’ve got your covered!
And third, we’ve got some great product recommendations for you to try to create your own smokey eye!
Part 1: Jen’s “How-To” Get a Great Smokey Eye Look
When I do a smokey eye, the technique I use is similar to how I do my everyday eye makeup, but amped up a little bit.
What you’ll need:
Eyeshadow palette with colors varying from light to dark. Make sure a majority of the shades are matte
Various sizes of eyeshadow brushes – at least three if you have them
Eyeliner – either black or brown
Mascara, or even false lashes if you’re feeling adventurous!
The Steps:
In general, this is going to be a lot of blending! As the eyeshadow shades get darker, the eyeshadow brush will get smaller.
To make the instructions a little easier, here’s what I’ll be using below!
Eyeshadow Shades:
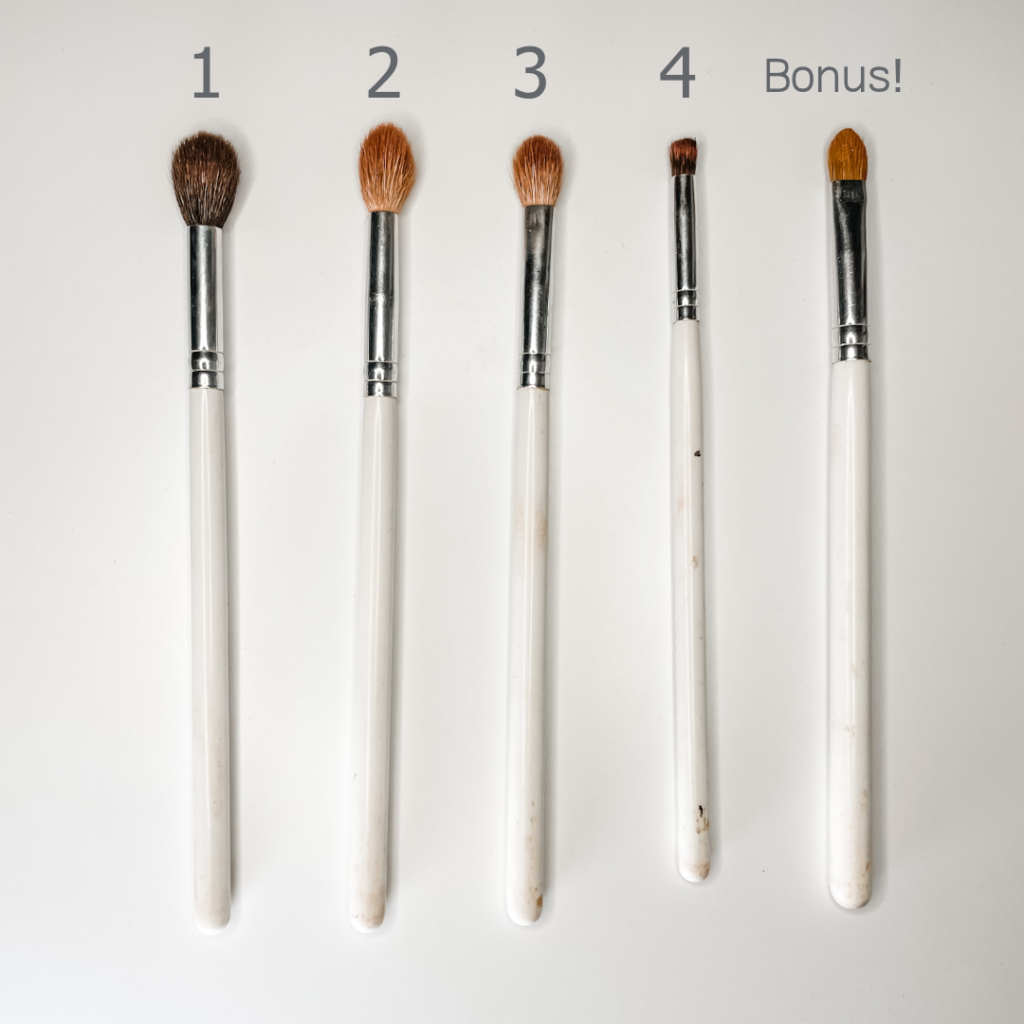
Eyeshadow brushes:
The Steps:
- Prime your lids with either concealer or an eyeshadow primer
- Using a large fluffy brush (1), start by putting the shade closest to your skin tone (1) all over your lid, up through the crease
- Take a slightly smaller brush (2) and a little darker shade (2) and place the color in your crease and blend
- Use brush 1 again and blend the color you just put down
- Take brush number 3, and eyeshadow number 3, and place the color on the outer corners of your eye and just a little bit into the crease
- Use brush number 2 and blend out the eyeshadow. But try to keep the blending to the areas you placed the shadow, and not dragging it through the rest of the crease or across the full lid
- Now take brush number 4 and eyeshadow number 4 and place on the outer corner of the lid, but even smaller than the last shade
- Use brush number 3 and blend out just a little bit so there’s no harsh edges
- Continue to follow steps 5 through 8 until the eyeshadow is dark enough for your liking
- For a little extra oomph, take the smallest brush (number 4, or even smaller if you have one), and brush a little of shadow number 4 across your upper lash line, before applying liner
- Apply your eyeliner across your top lid. Just a little bit for some extra definition. No elaborate cat-eye needed!
- On the lower lashline, using brush number 4, mix a little of shades 3 and 4. Make sure the shadow connects at the outer corner of your eye with the rest of your shadow. Blend the shadow toward the inner corner however far you’d like. Middle of your eye, or even closer to your inner corner! Make sure you blend, blend, blend! You spent so much time blending your eyeshadow, you want your lower lid to look the same! No harsh lines!
- Finish with lots and lots of mascara to complete the look!
Alternative options:
If you think your shadow is a little too dark, you have a couple options to brighten it up a bit!
- Using the lightest matte shadow (shadow number 1, or even lighter if you have it), use your finger or a flat eyeshadow brush and pat in the eyeshadow from your inner corner to the middle of your eye (or a little less)
- Use brush 2 or 3, and blend the spot where you placed the light shadow so it looks seamless!
- Similarly, using a shimmery shadow, follow the same steps as above for an even fancier look!
- Your finger will make the shimmer shadow more intense than a brush. Or, you can even spritz your brush with something like MAC Fix+ for even more sparkle!
Part 2: Dianne Follows Jen’s “How-To”
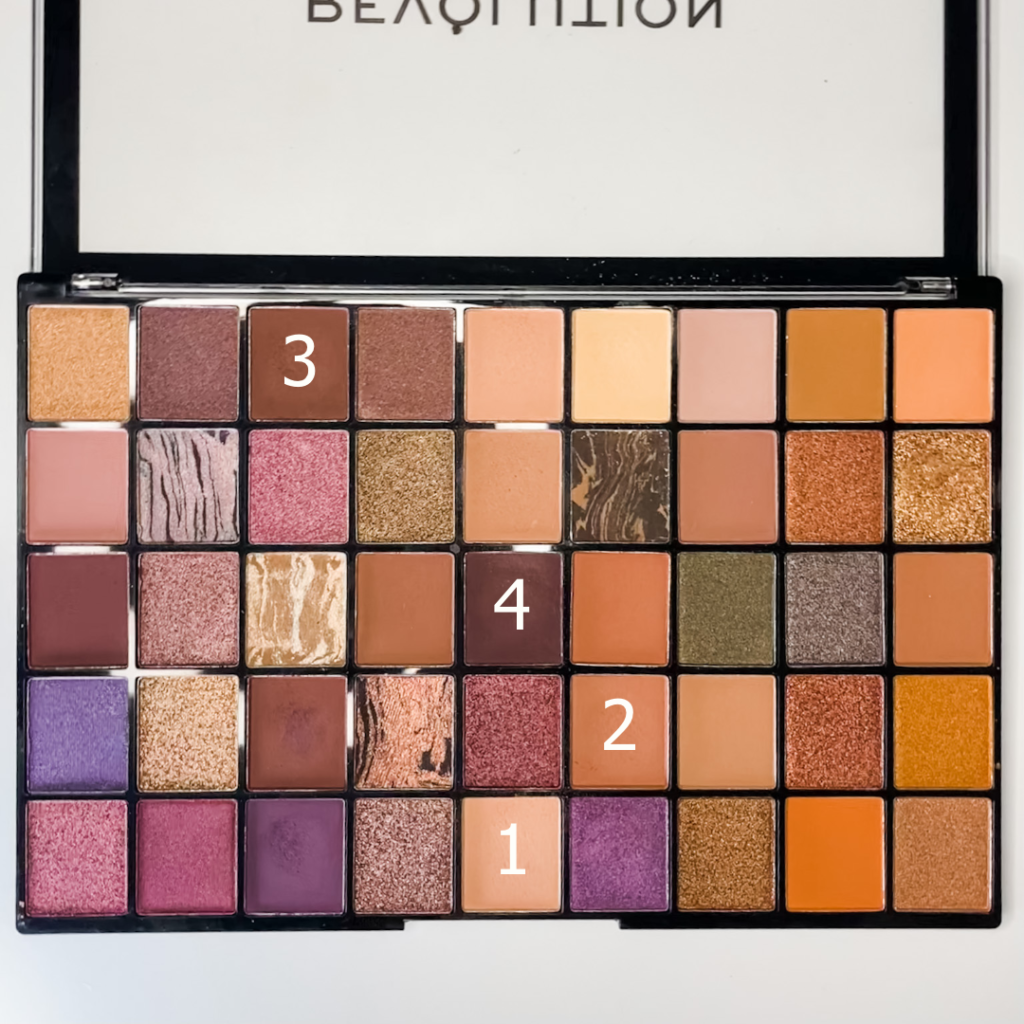
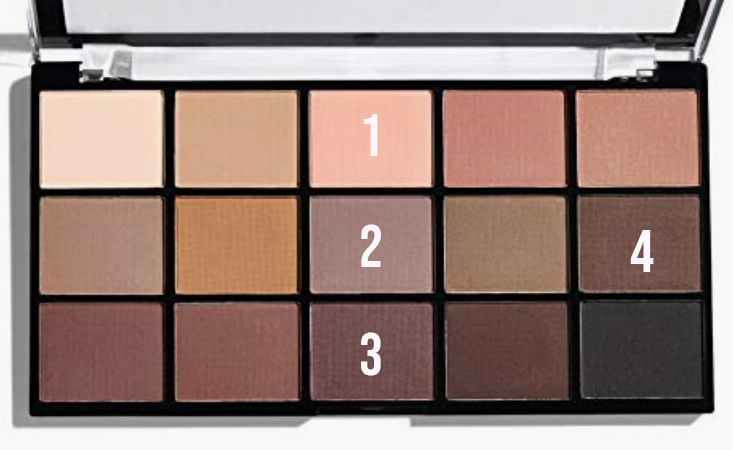
Let’s start with the palette I decided to use. As with Jen, I picked a palette that had several options from light to dark. Because my skin tone is a little more cool toned than Jen’s, I went with more of a taupe colored palette. My palette is Revolution Beauty Reloaded in Basic Mattes. The shades I used are below.
If you are unsure of your skin tone, you should check out our recent post, “How to Match Your Lipstick to Your Skin Tone”. In this article, we help you figure out what your skin tone is!
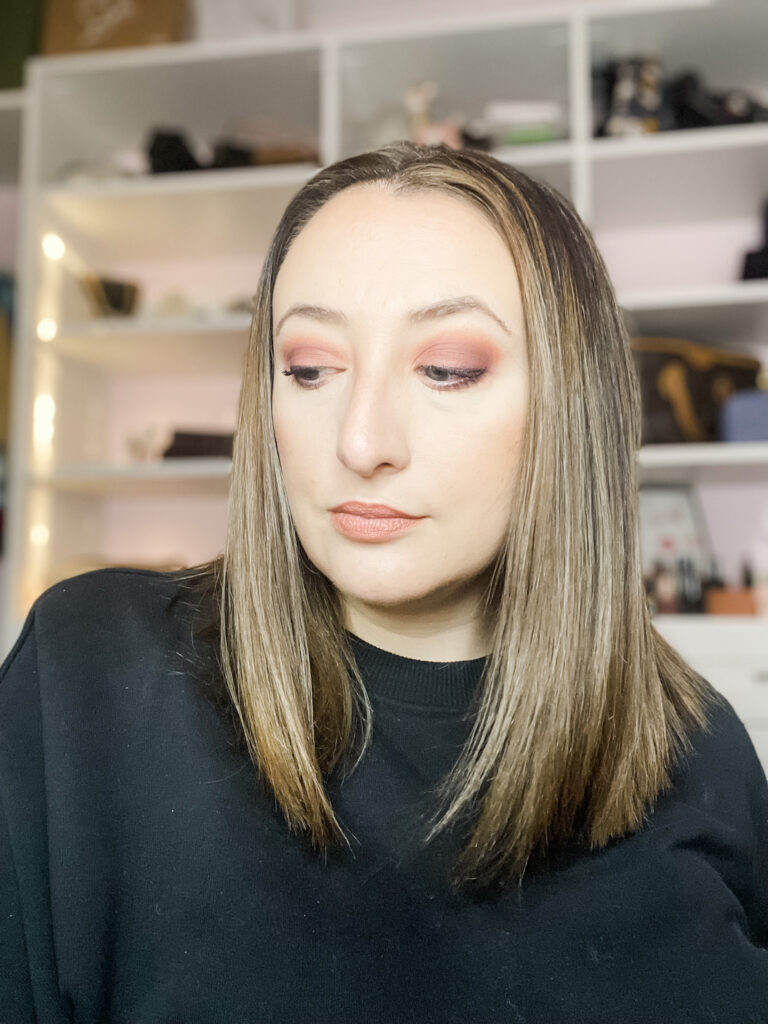
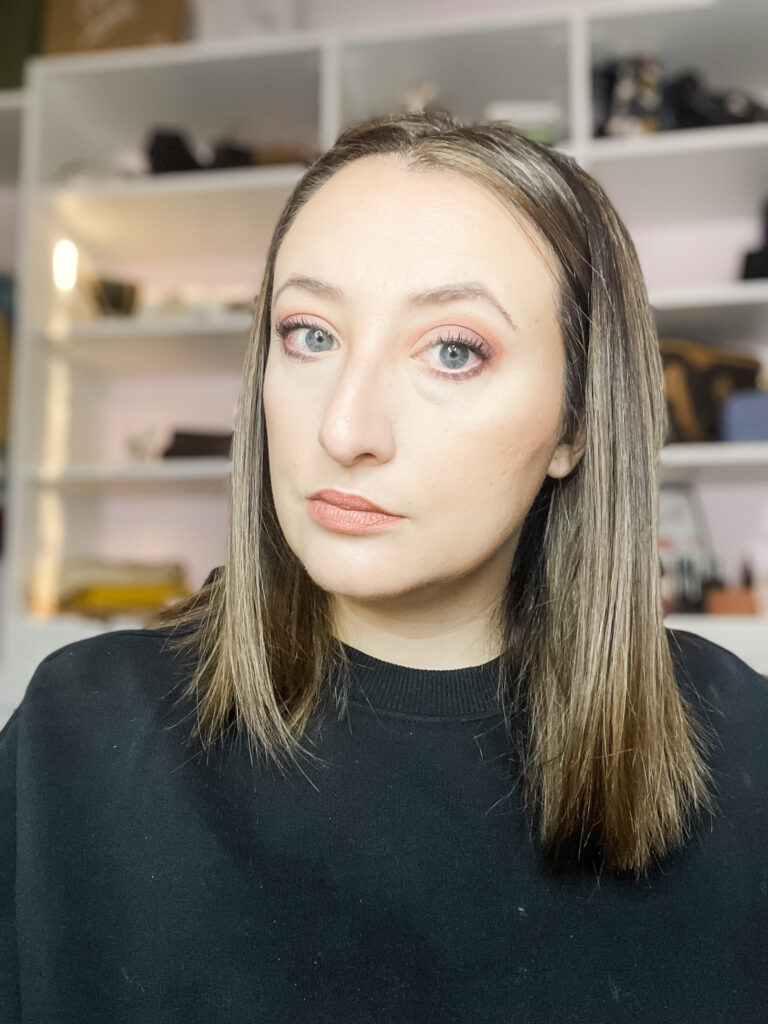
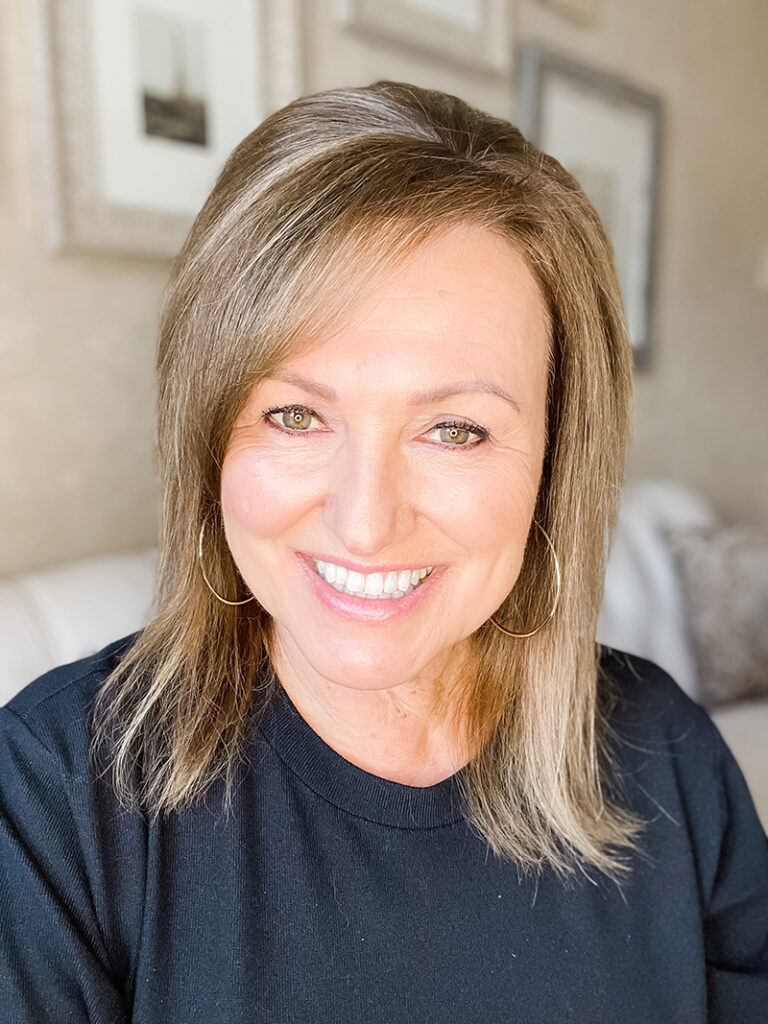
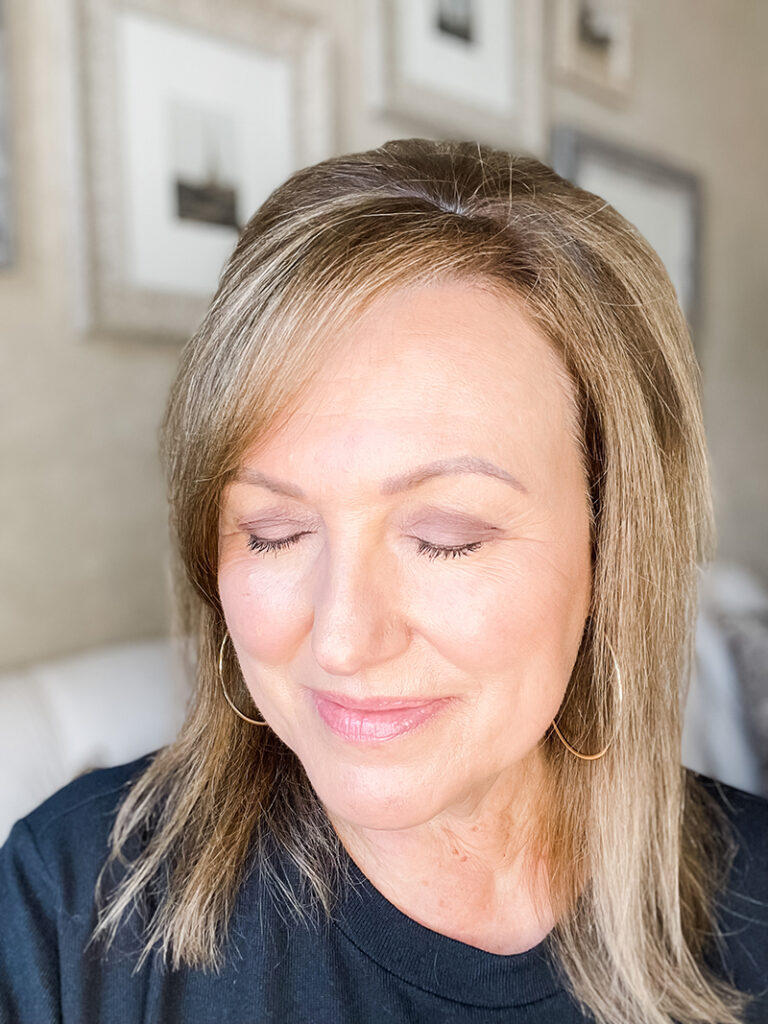
So, how did to go for me? In a word, awesome! I found Jen’s instructions extremely easy to follow. The photos below, I will admit, are from my second try. It has been a while since I’ve done a smokey eye in quite some time, so I felt I needed a quick refresher.
I actually recommend this, especially if you have an upcoming event (the holidays are quickly approaching). I would practice this at least once before your big night. While you can definitely get the look on your first try, you’ll be better at finessing the blending even by your second try.
I had the same brushes that Jen shows above (in fact, she had bought those for me a little while back), so that made it easy to get started and follow her instructions to a T.
The one place where I ran into some “trouble” was doing the lower lash line. I don’t typically use eyeshadow to line the lower lashes, I usually use a pencil. So the first time I tried it, I created a line that was way too thick. To fix it, I used a Q-Tip and some eye makeup remover to thin it out but then erased too much. So then I had to try it again. The reason I am telling you all this is so that you don’t get discouraged if this happens to you….or if you have difficulty with some of the other parts. You’ll get it!
Part 3: Our Easy Smokey Eye Product Recommendations
Eyeshadow Palettes

Brushes
Eye Liners
Mascaras
So how do you feel about the smokey eye? We hope it’s less intimidating for you to try it now. Let us know in the comments below!